Review - Ted Baker Girliest Convenience Vanity Set

Since Ted Baker is a really popular brand, and there are loads of other gift sets that include products from this vanity set, I thought I'd do a review :).. especially for those wondering what to get people (or themselves) for Christmas! This set is like.. the almighty Ted Baker gift set that is available at Boots, and at the moment it's included in the 3 for 2 Christmas deal. But there are sets down to £10 with mini-sizes that would be perfect for stocking-fillers or friends :) The video on it will be attached at the end.


The products included are as follows:
  • Heavenly Cleansing Body Wash 300ml 
    • Lathers so nicely, a lot goes a long way, leaves you smelling gorge :)
  • Divine Relaxing Bath Soak 300ml 
    • Doesn't bubble up too great, you need to use a lot, packaging isn't easy to get a lot out of.
  • Heavenly Rich Body Souffle 250ml 
    • Light moisturisation, soaks into skin, love the smell!
  • Divine Moisturising Body Lotion 300ml 
    • Light moisturisation, awkward amount comes out with one pump (too much for just hands, not enough for body), not rich enough for coarse areas.
  • Heavenly Fragrance Body Spray 150ml
  • Divine Fragranced Body Spray 150ml 
    • Both Body Sprays have a light amount of fragrance, not as fragranced as perfumes so kind of dies away unless topping up either the Souffle or the Lotion with respective smells.
  • Divine Scented Candle 
    • Never used, doesn't really smell like the other Divine items :S
Scents: The Divine & Heavenly are distinctions of not only the colour of the case (dark and light respectively), but also the scent. Divine is more of a sugary sweet smell, while Heavenly is more of a fresh smell with a bit of a lemon-y tint. My preference is definitely the Heavenly :)

Packaging: The only complaint about the packaging would be the Body Lotion & Bath Soak as mentioned above. Otherwise, the design is suitable for the products, and aesthetically, they are so pretty, I love swirly patterns :)

The Vanity: I LOVE IT! The pattern is obviously a personal taste thing, but I personally find it very pretty, neutral, and appropriate for all age groups. There is a little pouch inside as well as rubber bands to keep items in place (see video), and these confuse me because they're not the right size for the products that come with the gift set.. so I'm guessing it's meant for use with other things :) Can't wait to travel with this one day!

Price: £40 - pricey, but there are other little gift sets that include mini versions of some of these products for as little as £10. These will give you the chance to try them out before you get full sizes/get them as gifts/stocking-fillers for other people :)

Rebuy? Well, not the whole set lol but I would rebuy the Body Wash for sure, and the other things don't jump off the page but I do like them, so I may! :)

I've also tried the Invigorating Sugar Scrub and that is my favourite exfoliator of all time! Definitely recommend :) The smell is from the Divine range.

What are your favourite 3 for 2's at Boots or Ted Baker products? :) Has anyone tried the make-up from them?

<3yu

P.S. Thank you to my darling boyfriend from getting me this set :) LOOOOOVE <3

I Heart Faces Photo Challenge - Scenic Black and White


I became passionate about black and white photography after receiving my first Ansel Adams calendar in high school.  I love how black and white erases the clutter and, instead, draws the viewer into contrast and texture and light.

This photo of my niece, Sherah, and her husband, Andy, was taken at their wedding on the Oregon coast.  Surrounded by majestic rock and harsh waters, their solid embrace holds a future of promise that will withstand all that life throws their way.

The June day was windy and cold.  Who knew that this pragmatic bride, never flinching, wore long underwear under her gorgeous gown?


Review - Coastal Scents 28 Neutral Palette

I find that the things I use the most are things I take for granted and end up not doing a review for, so I thought I'd review something I use a lot, and that is the Coastal Scents 28 Neutral Palette. (Tutorials are linked to at the bottom :) - Please check them out!)

The first thing I want to say is that yes I live in the UK, but I got a hold of this through eBay. What a lot of people might already know is that what Coastal Scents does, is they import products from China, and basically just print their name on it. Therefore, no extortionate postage prices when you buy from eBay. My personal favourite seller is jolieeeee.


Here is my 28 Neutral Palette, and as you can see - I've swatched them as well as wrote the MAC dupes that I found on YouTube :) On to the review!

Colour/Finish Range: There are a range of finishes in this palette, from matte to frosty. However, most of them are either matte or satin, which makes it so practical, and so usable. The mattes are the main distinction from other neutral palettes (i.e. UD Naked Palette). You can do classic eyes with dark lips as well as the no-make up look for work/school. The colour range isn't just amongst browns and highlights, but also ventures a bit into the pinks and the purples. And obviously there are 2 black colours that are handy to have.

Formula: In general, most colours are smooth, average pigmentation and they blend really well. However, there are a couple that are less pigmented and less smooth than the others. While I think the colours are brilliant for the price, I've seen people comment that they are a bit powdery and a bit chalky. I agree with the former, but the latter, I haven't found so much.

Packaging: Standard really, just a matte black plastic palette :) More practical size than the 88 Warm Palette I think.

Price: It depends, because different sellers sell them for different prices, but I bought mine for $16 which works out at about £10.. including shipping. Screw Coastal Scents much?

 (L: No Flash; R: Flash - Click for larger pictures :))

All in all, I think it's a brilliant palette to have. It has such a wide range for colours, ANYONE can learn how to use them, the matte colours open a whole new window to possible looks, and it saves you so much money in the long run. I think since I've bought this palette, I have bought less and less dupe eyeshadows that I don't really need. I've also been able to do classic eyes with dark lips, as well as the no-make-up look that you really can't do without a selection of matte shades.

It's by no means a replacement for MAC.. but I would still recommend it to anyone, because 1) it's cheap, 2) it gives you matte colours that are hard to find & 3) you WILL use it.

Rebuy?: Oh yes :)

<3yu

Tutorials I have done with this palette..
- The Natural Brown Look
- The Brown & Purple Look 

P.S. Check out my new knit dress from New Look (left bar) :) & my baby cousins' Christmas presents..
Lololol I love having a baby in the family..

Snow! & November Favourites :)

Hi everyone - hope all your Black Friday shopping has been brilliant (who else ordered from Sigma? :)) and that if you are from the States, that you had an amazing Thanksgiving!

Anyway, I woke up this morning to a surprise! Pretty!

But on to this morning's post.. :) (because I have a sneaky feeling I'll make another one today.. lol)

It's the end of the month and Idk about blog-side, but on YouTube, it's when my subscriptions get flooded with monthly favourites. So naturally, I made a video which will be attached at the end of the post. Here is the general overview:
My November Favourites were..
- Nails Inc., in Jermyn Street - beautiful dirty plum, great for winter, dries fast which is always a plus!
- Bourjois Effet 3D Cosmic Lipgloss in No. 29 - makes your lips look a bit lighter due to infinite small sparkles - yum :)
- BodyShop Love Gloss in No. 17 - passion fruit smell, yellow cancels out some redness in your lips, making them a bit lighter and a bit pinker but natural :)
- Lipgloss by H&M in Coco Kiss in Aruba - nice candy smell, pink brown sparkles that has a similar effect to the Bourjois lipgloss, except with a pinky/browny tone. Gorge.
- Barry M Dazzle Dust in Tan No. 39  - a pinky, browny, tanny, sparkly (lol) all over lid colour - gooorgeous.
- Sleek Storm Palette, top left colour - beige-y gold - great all over lid colour :)
- ELF Elements Palette - handy for storing MAC e/s for cheaper & great for travel, especially when mixed in with MAC e/s and ELF elements for eyes, face, lips, etc., Massive mirror and a slot for your applicators! (and an easy way to drool over pretty colours all in one place)
- Sleek Blush in Flushed No. 935 - WHA-BAM red. But when applied lightly, very natural blush for me :) LOVE!

As I say in the video, monthly favourites have been difficult for me because my new storage allows me to see everything I have and therefore I've been using lots and lots - there isn't a few products that I've used ALL the time. So.. needless to say, they're not the typical 'favourites' that you see out there, in terms of why they are chosen, but they are still re-discovered or lovely products :)

So, what are some of your November favourites? :)

<3yu


Best Kept Secrets - Barbara Daly Oil-Free Foundation Review

"Best Kept Secrets" is something I came up with (5min ago), which is basically going to be reviews/intros to products that not a lot of people know of. One of the most viewed videos on my YouTube is "Top 5 Unknown Drugstore Products" so.. I thought people might like this too! :)

My first BKS is going to be on Barbara Daly's Oil-Free Foundation. If you guys don't know who Barbara Daly is, she is a famous make-up artist from England (Leeds to be specific) who's worked with the likes of Twiggy, Cindy Crawford as well as for politicians like Margaret Thatcher. Her make-up range is exclusive to Tesco, and can be found in larger stores.


Packaging: As you can see, the packaging is absolutely gorgeous. It's so sleek - the bottle is very "clinky"-sounding, frosted glass, and the logo is so.. classy! Yes, the packaging is what drew my eyes, I'm not even going to deny it. However, the surprise doesn't stop there.. this foundation is neither pour-out nor pump. It's a spatula:


And to be honest, I prefer it to pour-out or pump, because I can put this directly on my face without having the mess on the back of my hands, or a need for a palette. It's great for personal use. Also, you get 29ml which is a good amount to have before you get bored. And the size is really cute and easy to pop into your make-up bag!

Formula: I bought the 'oil-free' foundation, and there is another line with exactly the same packaging and same colour range called 'moisture' foundation. So you can pick one that suits your skin type, which immediately rules out the possibility of a too-dry face or a too-oily face (which I think is one of the reasons why Revlon Colorstay is so popular). I have quite sensitive skin, and this hasn't broken me out. I would say this oil-free range is a mattifying foundation (as opposed to say a natural/dewy finish).

Secondly, it smells like cinnamon-y soap. I know this shouldn't factor into the judgment but guys - it is YUMMY! 'Nuf said.


Thirdly, and most importantly, it blends so well, doesn't dry too quick, and sits on your face SO well. I find it to be really light on my skin and I can tell that it looks like I have less make-up on than when I used to use Revlon Colorstay, but with the same amount of coverage. I put the minimum amount of this and it has medium to full coverage. I use much much less concealer than I used to. MUCH less.

Colour Range: This is the only thing I'd say wasn't the best about this foundation. I got the darkest one, and I noticed that there was a massive gap between this one and the one lighter than this. Also, I'm a NC30-35, and it was way too yellow for me (if you guys have watched my foundation video, you know I mix it with a more pinky foundation), so it may be the case that you mix like I do or you wont find a colour :( which sucks!

Price: £6.99. I was on a budget when I was looking for this and it was £5 cheaper than the Revlon Colorstay so I was a bit skeptical, but.. never mind! :P

I love this foundation, and it's just a shame that the colour range is quite bad. That is the only thing that would put me off rebuying it, but I love my routine now so much that I wouldn't be surprised if I rebuy this alongside the other foundation that I mix it with. So..

Rebuy?: I think so! :P

<3yu

P.S. I realise that some people may be skeptical of the review because I mix it with another foundation, and it might give different results than as using it on its own. However, I've applied it on its own and I've been testing it on blemishes on my hand as I wrote this so I hope you guys find that credible enough :)

P.S.S Click here for a tutorial on how I use this foundation :)

Knots on a Counting Rope

Every year before their Thanksgiving Feast, the second grade class reads a book called Knots On A Counting Rope by Bill Martin and John Archembault.  The book is about a Native American boy who requests his favorite story from his grandfather --- the story of the special night when the boy came into the world.  Though born blind, the boy learns many ways to see without needing his eyes.  Each time the Grandfather tells the boy's tale, he adds another knot to the counting rope.  Once the rope is full, the boy will know the wonderful story by heart and will be able to tell it himself.

After the children have heard the story, the parents are invited to the class to tell a story of their child.  Here is my humorous and sentimental story of Arielle.

Photo by Ken Rada

When Arielle was born, we knew we had our hands full.   She was the child that made me wake up in the morning, look in the mirror and say, “I’m the mom, I can do this!”   It was a few years later that I truly understood the problem – she was really a teenager, trapped inside a baby’s body.

As a baby and toddler, she quickly learned to speak her mind.  At nine months, she spoke one of her first words, “Apple Juice,” and just a few months later, as I was dropping her off at the church nursery, she spoke her first sentence, “No play!”  At 18 months, she demonstrated her keen intelligence at lunch one day.  While she was busy coloring, I placed her lunch on the table, which included a slice of rolled up turkey.  She took the turkey and began to color on it with a marker.  “No, No,” I said, “We color on the paper, not the turkey. “  Determined to show me that she was capable of doing the exact opposite of what I said, she promptly rolled up the piece of paper, shoved it in her mouth and ate it!  Before she was two, she was speaking clearly.  One day, when she was feeling exceptionally upset with me, she looked me in the eyes and said, “I’m going to hurt you badly!”  At this point, I looked at my sweet little girl and thought, “I am so proud of her.  She used proper grammar!”

A defining moment, however, happened around age two.  Always trying to keep up with her older sister, Arielle potty-trained very early.  One day, when the bathroom was in use, she used her resourcefulness and, instead, entered the door adjacent to the bathroom  - the hall closet.  It was there that she pulled down her pants and went potty right on top of my paperback copy of Dobson’s The Strong-Willed Child!

Most people think that Arielle was named after the Little Mermaid, but she was not.  Arielle was named after God’s special name for his cherished land of Jerusalem.  Her name means “Lioness of God.”   Brave, courageous and elegant, Arielle is an individual who shows the strength and the courage to stand up for what she believes. Her middle name, Evangeline, comes from her Grandmother and means “Bearer of Good News!”  As Arielle has grown and matured, her gifts have developed.  She is kind, compassionate, artistic, determined, industrious, loyal, resourceful and wise.  We are so proud to have a daughter like Arielle. 

HAPPY THANKSGIVING!


Candied Sweet Potato Cupcakes


Sweet potatoes have never been a Thanksgiving tradition in our house, but now that we are "Southerners", I thought it would be fun to incorporate this root vegetable into our family feast.  These Candied Sweet Potato Cupcakes, from Martha Stewart's Cupcake book are a take on the famous southern side dish, complete with a marshmallow and candied pecan topping!


My first step in tackling these cupcakes was to simplify the recipe!  Rather than roasting sweet potatoes specifically for these cupcakes,  I opted for canned sweet potato puree.  While I'm sure that homemade roasted sweet potatoes would be even more delicious than the canned version - my family will never know!


Thanksgiving break is a great time to incorporate the little bakers.  Cracking the eggs (into a separate cup, please!) seems to be the favorite task!

I made a few more substitutions in the recipe including the use of white whole wheat flour and substituting one stick of butter for 1/2 cup of canola oil.  I think oil makes a cake moister (not to mention cutting down on the saturated fat!)


I also reduced the baking time to 20 minutes instead of 28 minutes.  From experience I have learned that Martha's oven runs a lot cooler than mine!


Now comes the fun part - the topping!
Carefully arrange cupcake-sized piles of marshmallows on a baking sheet covered with a Silpat mat or parchment paper.  Top with candied pecans (store bought or make your own).  I left some plain for those that have yet to discover the pleasure of a candied pecan!


Since I don't own a kitchen torch, I broiled my toppings for a mere two minutes!
Let them cool slightly and slide them onto the cupcakes.


I was expecting these to taste just like pumpkin, but was pleasantly surprised to find that they had their own subtle flavor.  The topping adhered nicely to the cupcake and the combination made a truly delightful, not-too-sweet bite.  I hope they keep until tomorrow!

Candied Sweet Potato Cupcakes
adapted from Martha Stewart's Cupcakes

Dry Ingredients:
2 cups white whole wheat flour
2 teaspoons baking powder
1 teaspoon Kosher salt
2 teaspoons ground cinnamon
1/2 teaspoon nutmeg

Wet Ingredients:
1 15-ounce can sweet potato puree
1/2 cup butter
1/2 cup canola oil
1 cup granulated sugar
1 cup brown sugar
4 large eggs
2 teaspoons pure vanilla extract

Preheat the oven to 375 degrees.  Line 24 muffin tins with paper liners.  Whisk dry ingredients.  With an electric mixer, beat butter, oil and sugar.  Add eggs.  Add sweet potato puree and vanilla.  Beat until smooth.  Add the flour mixture in batches and beat until completely incorporated.  Bake for 20 minutes or until a toothpick inserted in the center comes out clean.

TOPPING:  Making 12 at a time, make 12 marshmallow mounds on a cookie sheet lined with a silpat mat or parchment paper.  Add pecans.  Broil for about 2 minutes or until brown, watching carefully!  With a spatula, transfer marshmallow mounds the cupcakes.  

Blogsale Lipstick Purchase & Boots 3 for 2 :)

I can't believe it's still a month to go before Christmas and I'm doing my Christmas shopping!

So yesterday I went into town before my friend's surprise 21st (see left for cake candle-lighting disaster) to grab a few gifts, and decided on Boots' 3 for 2. Seeing as I was there to get gifts for 2 people, I decided to treat myself to the third free gift :)

And earlier that day, a post had arrived from ViviannaDoesMakeup, with my first ever MAC lippie, Faerie Glen from the Tartan Tales collection :) To my surprise, she'd also included a 17 Mirror Shine Lipstick in Nudist Peach which was so sweet of her. I've fallen in love with both of them, and thought I'd include them in my semi-haul post along with my treat from aforementioned gift-buying session! :)

So here they are:
I felt like there have been quite good reviews about this Umberto Giannini's Big Hair line, so I thought I'd give it a shot since I'm cursed with flat hair.. It's technically £10 for a mousse and a hairspray, and both are designed to give you, well, big hair (well done, Yu). The packaging is gorgeous, and the illustration is so pretty! And as far as I can tell, they are both full-sized, and, they smell GOOOOORGE! Definitely want to do a review on this soon :)
 And here are the lippies! The 17 one is quite sheer and kind of gives a peachy tint to my lips which is great for a lazy day :) It's quite moisturey and lovely! And the MAC one is just oh so gorgeous. The colour is something that I've been looking for for a while, it's like a pinky nude, but it doesn't wash me out at all. A great pink sister to my Rimmel Moisture Renew in Nude Delight. The consistency is really smooth, and at some point I feel like it dries a little bit but I think that helps the staying power..maybe? I have crazy pigmented lips and wasn't sure if a Lustre finish would be pigmented enough, and it was :) Yay! This being my farewell to my MAC lippie v-card, I've been exposed to the lovely smell and the gorgeous feel of the packaging of MAC lippies :) (which makes me want more.. eek!)

 (L: swatches of 17 Nudist Peach & MAC Faerie Glen; R: MAC Faerie Glen on lips!)

Anyway, I've been on a crazy shopping hype..
- Boots was sold out of Benefit's Her Name Was Glowla - PAIN! Will be persistent in search.
- Glitzy Glam customized make-up bag.. hehehe. Tempting!

Tonight, I'm heading off to the Birmingham Christmas Market with mine and Lisa's society - should be good fun (especially after a night at a Chinese all you can eat! Prepare for fat chunky Yu!)

What is No. 1 on your Christmas wishlist then ladies? :)

<3yu

FOTD: 11.22.10 - GOSH Golden Moss Eyeliner

I am so excited that so many people are following my blog.. Thank you so much, I'm having a blast blogging! :)

Anyway, I didn't REALLY know what to review and I haven't hauled, plus I quite like doing reviews on videos.. So I thought I'd do another FOTD, but then follow it up with a tutorial in the next week or so.. because a lot of people have difficulties in wearing coloured liners - which is what I tried out today! :)


This is the coloured liner I used today - GOSH's Velvet Touch Waterproof Eyeliner in Golden Moss. Bought after suggestion by aforementioned "not so friend" Lisa :) As far as I can tell, it's quite long-lasting for a pencil liner, it's very soft and great pigmentation. However, I do remember swatching some other colours and not finding them as creamy or pigmented.. anyway! On to the FOTD:

 I really like the subtlety of the mossy green, and the earthyness that it brings to the look. That being said, it isn't completely noticeable unless you zoom as seen above.. but you can notice the lack of definition of a black liner. The lipstick colour NEVER shows perfectly with flash - it's a bit more fuschia and darker than the zoom picture (Sorry :( ).

The other items used are as follows:
Coastal Scents 28 Neutral Palette
ELF Lipstick in Seductive
ELF Super Glossy Lipshine in Juiced Berry
MAC Blush in Style (haha yes, it needs some de-powdering..)
And of course the mascara, black liner blah blah blah.

I hope you guys like it! :) I think if the tutorial idea goes through, I will be using a liquid liner - specifically, the MAC Liquidlast in ElectroLady - an 18th birthday present from dearest friends, Abbey, Anna and Lindsay.

SOME UPDATES:
- Sent off a swap package to Mandy @ DazzleLikeGlitter!
- Made my first blog-sale purchase off Vivianna @ ViviannaDoesMakeUp
- Bought a beautiful bracelet for my friend's 21st - I hope she likes it! :)

<3yu

Waiting for Snow


When I was growing up in the midwest, we would wake up on a winter morning and say, "I hope it snows, today!"  Now, that we live in the south, my kids say, "I hope it snows this year!"  The girls' older sister, Anna, came up with the idea of paper snowflakes for this week's I Heart Faces theme:  Paper!

For more great photos, visit I Heart Faces!


Nailpolish Collection!

Omgggg 20 followers?! I love you all :)

So since I've ventured into the world of blogs, I've noticed a massive increase in nailpolish content compared to YouTube, so I thought I'd give it a shot! I'm not a massive nailpolish fan, I used to be when that was the only 'makeup' my mom let me wear, so why not go back to my roots? :P
This is my usual storage.. really not that many! My favourites of the season go on top of my storage box..

So there's the gang! Really not that many in comparison to other gurus, and I know, a very limited range of colours - but that's what I like :) Let's get started..

The Clear&Neutrals:
(L to R: Beauty Nation Top Coat, CANMAKE Top Coat, 2True Top Coat, French BonBon No. 6, Nails Inc., Elizabeth Street, No7 Speed Dry in Coconut Ice 05 - definitely my fave out of the lot)

The Pinks&Reds:
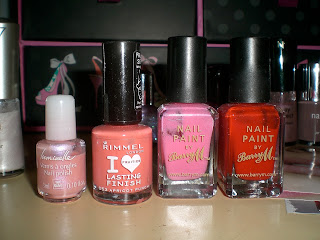
(L to R: Yves Rocher Luminelle in Rose Reflets 03, Rimmel I Love Lasting Finish in 053 Apricot Punch - fave of the lot, Barry M Nail Paint 279 Bright Pink, Barry M Nail Paint 262 Bright Red)

The Purple&Plums (my favourites!):
(L to R: CANMAKE Colorful Nails No. 38, CANMAKE Colorful Nails No. 30, Collection 2000 Hot Looks Fast Dry No. 12 Minx, GOSH Nail Lacquer No. 064 Frou Frou, No7 Stay Perfect Nail Colour in No.50 Oyster, Nails Inc., in Jermyn Street - they're all faves!)

I'm currently wearing GOSH's Frou Frou and it's so.. so.. pretty! (Sorry for the chipped nails lol washing up SUCKS!)

The Blacks:
 (L to R: Missguided in Misfit - SO PRETTY, MUA in black..?)
A tip on Missguided's nailpolish - run a layer of nail polish remover over it to get the gold to come out more! :)

The Blue:
(Rimmel 60 Seconds in 825 Sky High - the only blue worthy of my nail collection ;P Wore it a lot springtime!)

This season's favourites is definitely my GOSH Frou Frou, Nails Inc Jermyn Street and Missguided's Misfit. The latter 2 I got for free from Glamour & Cosmo respectively so.. pretty good ey? :P

I do get quite picky with nail colours, and often do stick to what I like - I don't venture very much. My favourite way to have my nails is getting acrylic French Nails but I don't have £20 to spare all the time to get them done and they take ages to take off!

The main reason being, I don't like fussing around with nails! Unless the brushes are wide, the colour settles evenly, and it dries quickly, I don't like it. Which is why the Rimmel 60 Seconds, Missguided, and Gosh's Nail Lacquers are my favourites. Nails Inc. are alright when you keep it to 2 coats but anymore than that (which I am tempted to apply with the Elizabeth Street) and you're setting yourself up for being a living statue for hours! The Barry M Nail Paints are good.. but I got 2 completely wrong colours, and do not like either of them anymore.

Actually, a lot of these nail polishes I never wear anymore, and once I get more followers I will consider selling them off.

Anyway, I hope you found this interesting, I always like to look at people's collections to see if there's anything I wanna get or if there is a colour I've never seen before and would like to try out :)

So, ladies. What is your go-to nail polish this season? :)

<3yu

Oreo Turkeys


Our Annual Oreo Turkey making all began eight years ago when Samuel was in kindergarten.  Still unaware of the overachieving alpha room-mom type, I naively volunteered to bring dessert to the kindergarten Thanksgiving Party.  In my mind I was thinking, "Two-dozen grocery store cupcakes?"  The room mom had other ideas.  "Why don't you search the internet for some cute Thanksgiving dessert ideas?  Maybe you could make something that looks like a turkey?"  Eight years ago, I had a 5-year old, a 2-year old and a baby.  I showed up to school parties with a double stroller and a diaper bag.  I barely knew what the internet was!  My competitive nature, however, spurred me on and I came across these adorable Oreo Turkeys.

Thus began my journey into food crafts and, perhaps, makes me now a little guilty of being a slightly overachieving room-mom type myself.  In any case, eight years later, I think I have these turkeys down to a science and the kids think it's a great Thanksgiving tradition!  

STEP #1


  • Do everything in assembly line fashion.  
  • Lay out all the Oreos (I use double stuffed) on a Silpat mat or parchment paper.
  • Melt about 8 ounces of chocolate in a Gallon Sized Ziploc bag.  
  • Snip the corner 1/4" or less.  This bag will be used for piping chocolate "glue"

STEP #2

  • Put a dime-sized dot of glue on the lower center part of the Oreo.
  • Working quickly, add one Whopper to the top of the "glue" spot.


STEP #3

  • Working 3 or four Oreos at a time, pipe on chocolate to the remaining top portion of the Oreo.
  • Add five Candy Corn "feathers".  The largest Candy Corn should be in the center.

 STEP #4


  • Put a dot of chocolate on top of each Whopper.
  • Attach a Candy Corn Head.
  • Using "Writing Icing" (Not Gel) dot two blue eyes and a red "wattle" - (or is it the the "snood"?) to the head and let dry.
Enjoy!  These are actually quite tasty.  It's hard to stop at just one!


THIS POST MAY BE LINKED TO: MONDAYSMOUTHWATERING MONDAYSMADE BY YOU MONDAY,MINGLE MONDAY , HOME SAVVY A TO ZTUESDAYSMUSHKI LOVES MY STUFF TUESDAYS AND THE TABLE, TEMPT MY TUMMY TUESDAY,TWO MAIDS A BAKING, TIP JUNKIE ,GET YOUR CRAFT ON, CRAZY SWEET TUESDAYS!  TEA PARTY TUESDAY  MANDY'S RECIPE BOX WEDNESDAYSSHOW AND TELLWORKS FOR ME WEDNESDAYTHIS CHICK COOKSLADY BEHIND THE CURTAINGINGER SNAP CRAFTS,  THURSDAYS IT’S A KEEPER THURSDAYSSTRUT YOUR STUFFFULL PLATE THURSDAYS , CHIC & CRAFTY PARTY, THRIFTY THURSDAYS  FRIDAYS: I’M LOVING IT, FOODIE FRIDAYGROCERY CART CHALLENGEFOOD ON FRIDAYSFRIDAY POT LUCK, TATERTOTS AND JELLO,  SWEET TOOTH FRIDAY,,  FRIDAY FAVORITES,  FUSION FRIDAYS FRIDAY FOOD , BACON TIME SATURDAYS:SWEETS FOR A SATURDAY SIX SISTERS STUFF SUNDAYS: NIFTY THRIFTY SUNDAYAWELL SEASONED LIFE